
Overview
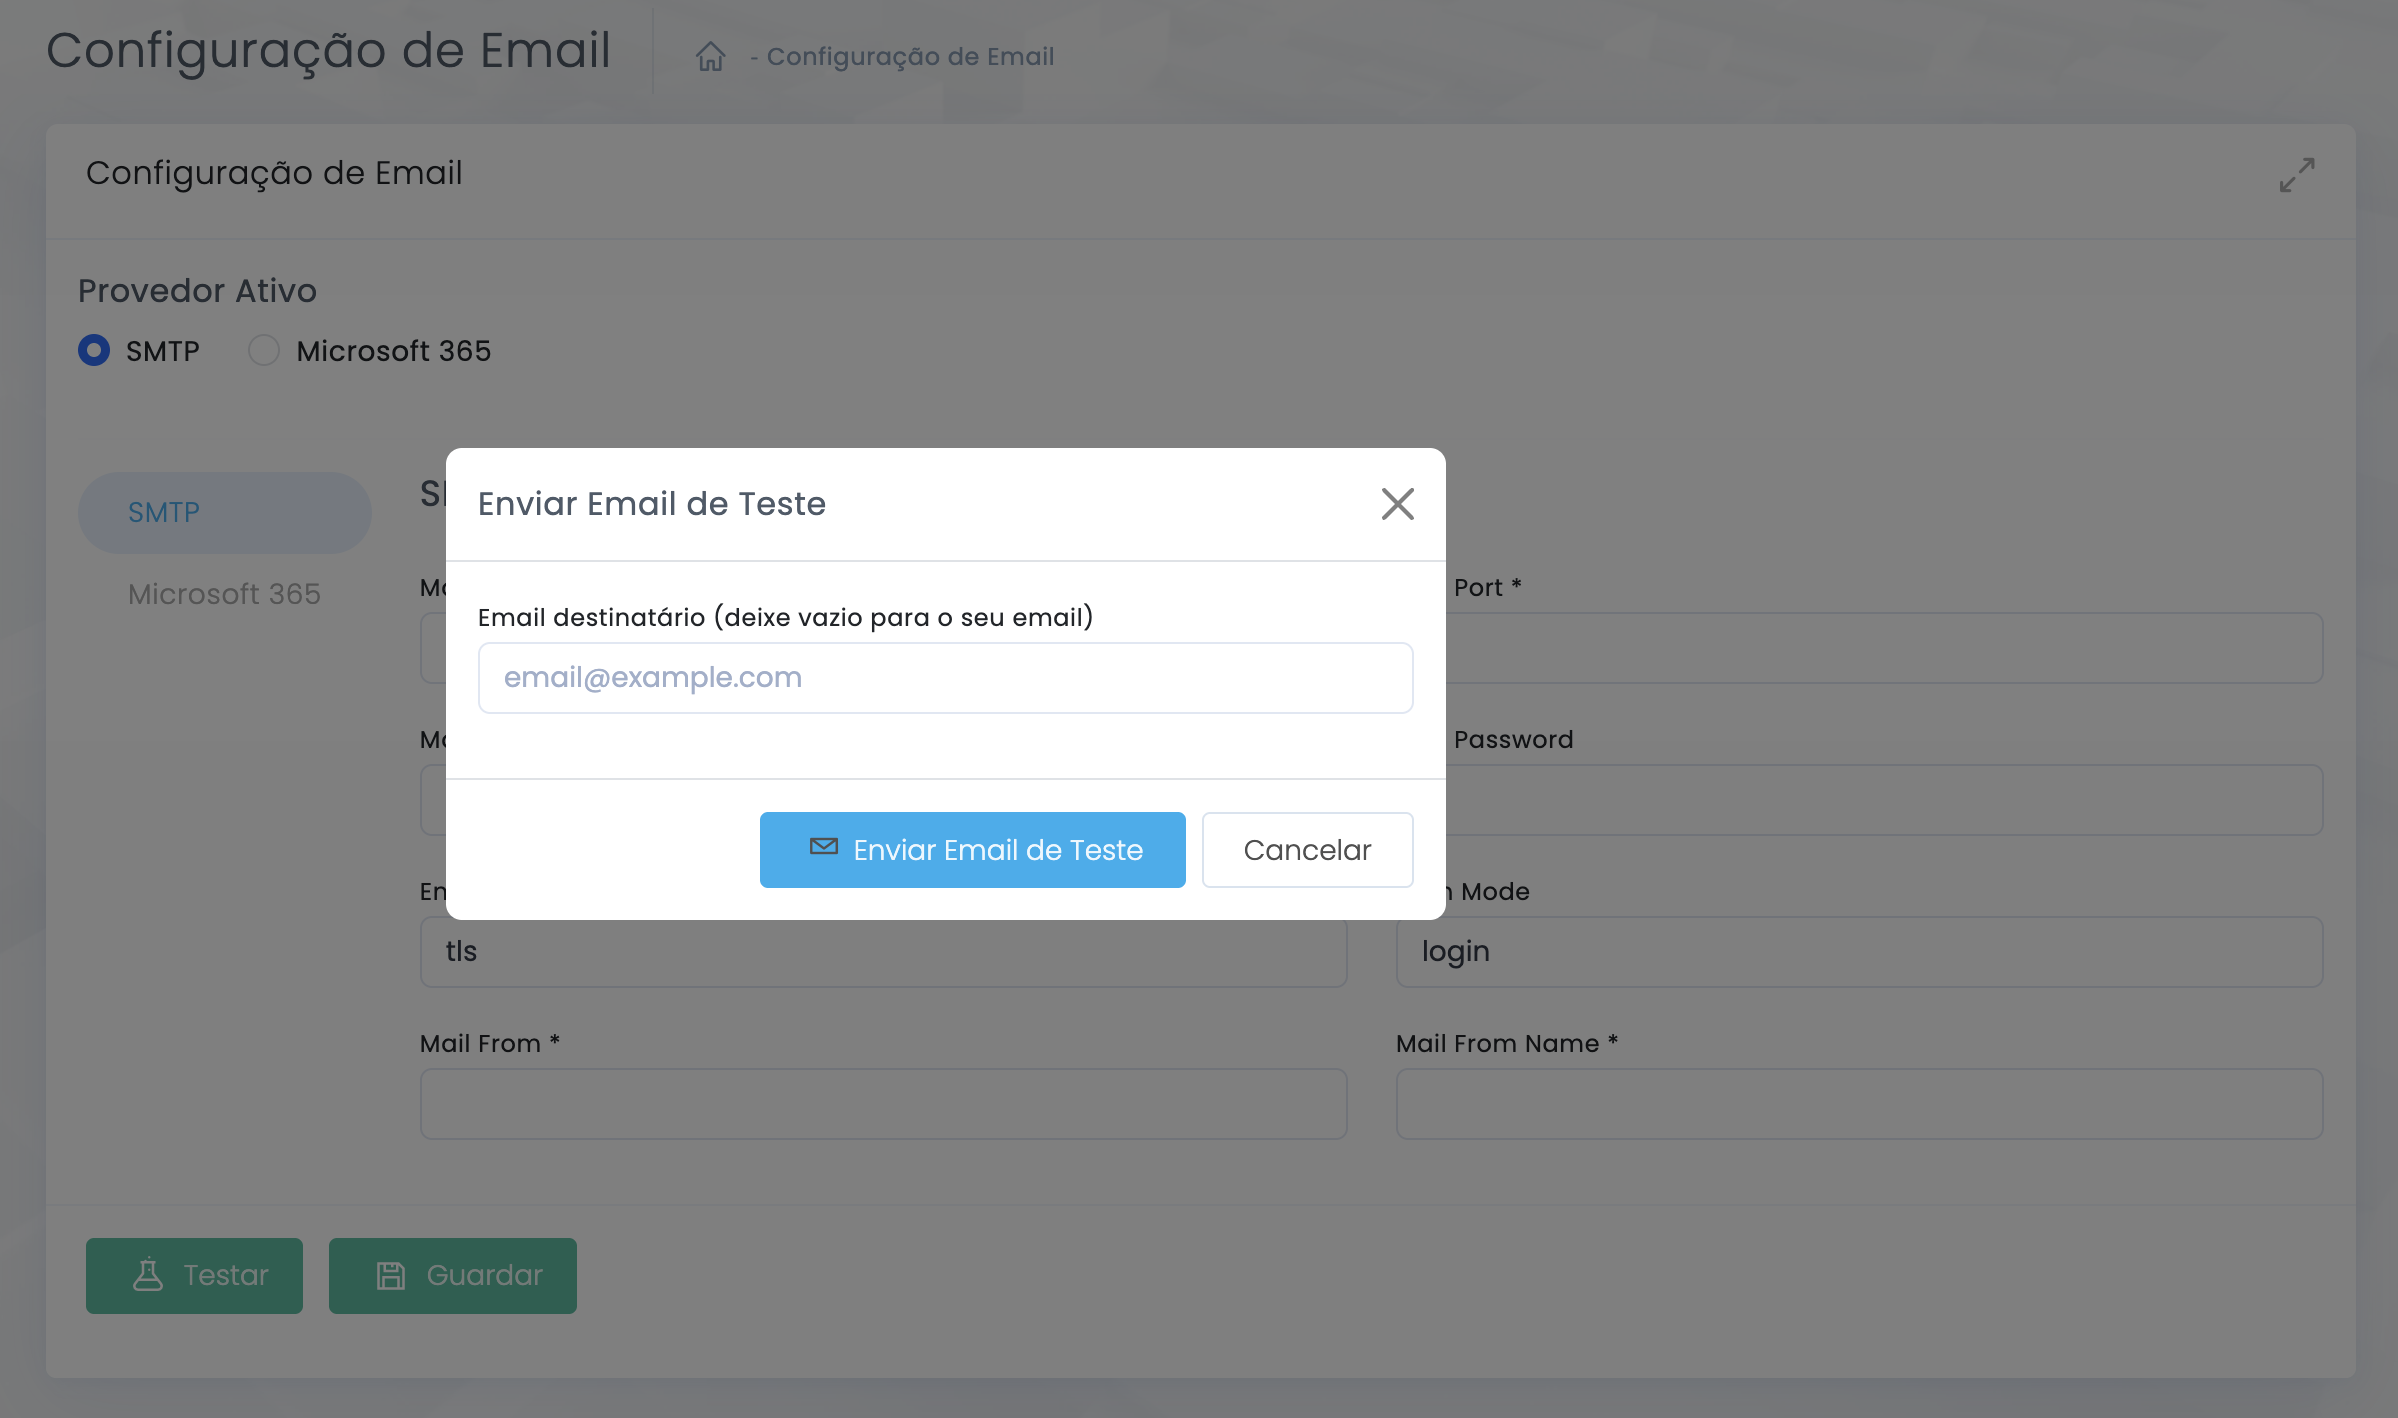
Inside Settings → Email Configuration, the Active Provider field now controls two different modes. If your provider gives you host, port, username and password, the correct path is SMTP. If the operational mailbox is managed in Microsoft 365 / Entra ID, the setup is done through an Azure application and then connected to Studio using Tenant ID, Client ID and Client Secret.
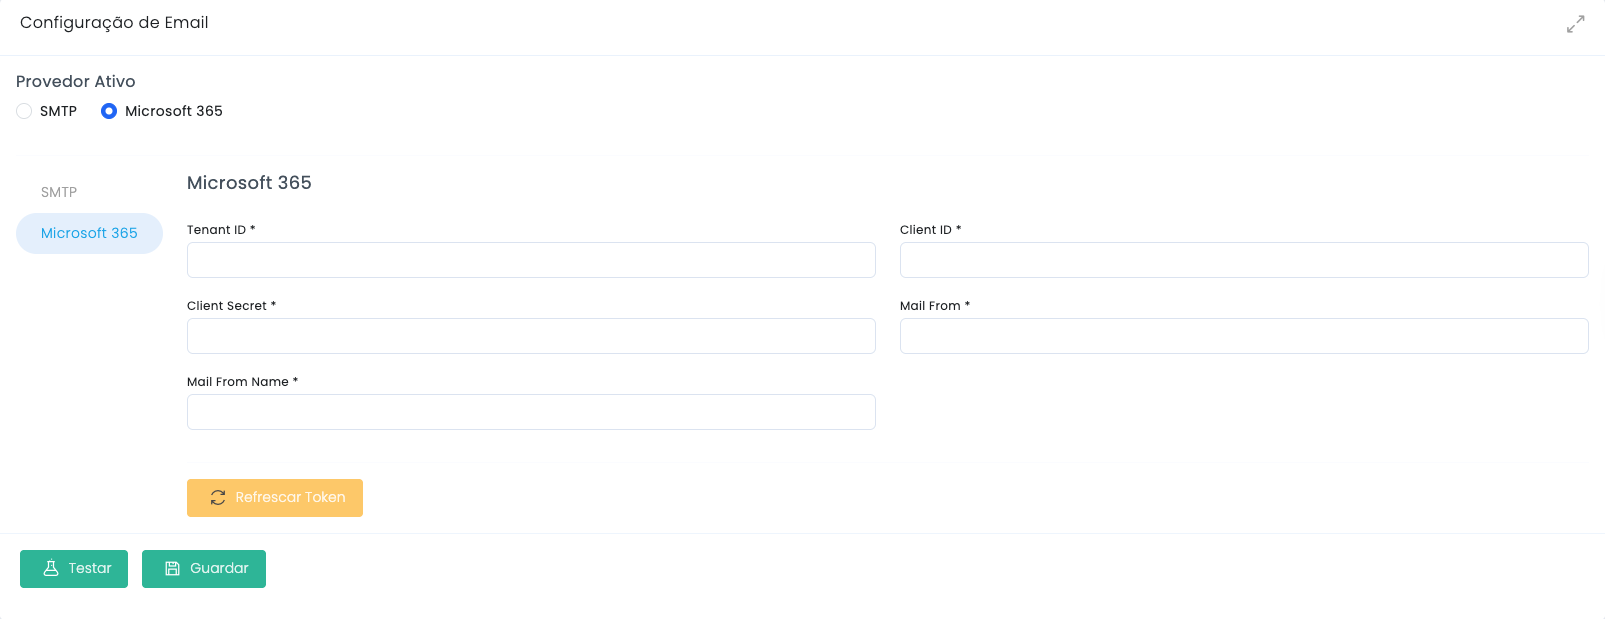
Configuration view in Studio
The two real forms
When to use each protocol
Quick decision guide
Use SMTP
Choose this option when your provider gives you Mail Host, Mail Port, Mail Username and Mail Password. This is the most common setup for traditional sending accounts or external SMTP services.
Use Microsoft 365
Choose this option when email delivery must be authenticated through the organization's Microsoft infrastructure. In this scenario, access is not based on host and password but on an App Registration created in Azure.
- In both cases, Mail From and Mail From Name should match the real sender your clients will see.
- The final test should happen after clicking Save, so you validate both authentication and delivery permissions.
- If the organization uses Microsoft 365 with internal policies, admin consent may be required before the flow can work.
Configure through SMTP
Base flow in the backoffice
Mail Host
The SMTP sending server. Common examples include smtp.gmail.com or smtp.office365.com, depending on the provider.
Mail Port
The port used by the service. In many setups this is 587 with TLS, but it should always follow the real provider instructions.
Mail Username
The account used for authentication, usually the full email address that will handle sending.
Mail Password
The account password or an app password when the provider requires stronger authentication.
Encryption
In the base screen this appears as tls. Keep this value when it matches the protocol required by your provider.
Auth Mode
In the standard Studio flow the default mode is login. Only change it if the SMTP provider explicitly gives you a different instruction.
Mail From
The sender email address customers will receive in notifications, confirmations and automated website flows.
Mail From Name
The visible sender name, usually the brand, company or operational identity of the project.
SMTP step by step
Select SMTP in Active Provider and in the left-side tab of the email configuration itself.
Fill in the host, port, username and password provided by your supplier, confirm Encryption and Auth Mode, define Mail From and Mail From Name, then click Save and Test.
Configure Microsoft 365 in Studio
Backoffice fields
Tenant ID
The Microsoft Entra ID directory identifier. It is copied from the application page in Azure after registration is created.
Client ID
The registered application identifier. In Azure this appears as Application (Client) ID.
Client Secret
The value generated in Certificates & secrets. It must be saved at the moment it is created, because it becomes hidden afterwards.
Mail From
The email account that will send the messages. It should match the account allowed for this delivery flow.
Mail From Name
The visible sender name that will accompany the emails sent by the website.
Refresh Token
After inserting the application credentials, this button helps refresh the access before the final test.
- In Studio, select Microsoft 365 as the Active Provider.
- Paste the Tenant ID, Client ID and Client Secret values coming from Azure.
- Fill in Mail From and Mail From Name, use Refresh Token if needed, then click Save and Test.
Create the app in Azure Portal
Microsoft 365 tutorial with screenshots
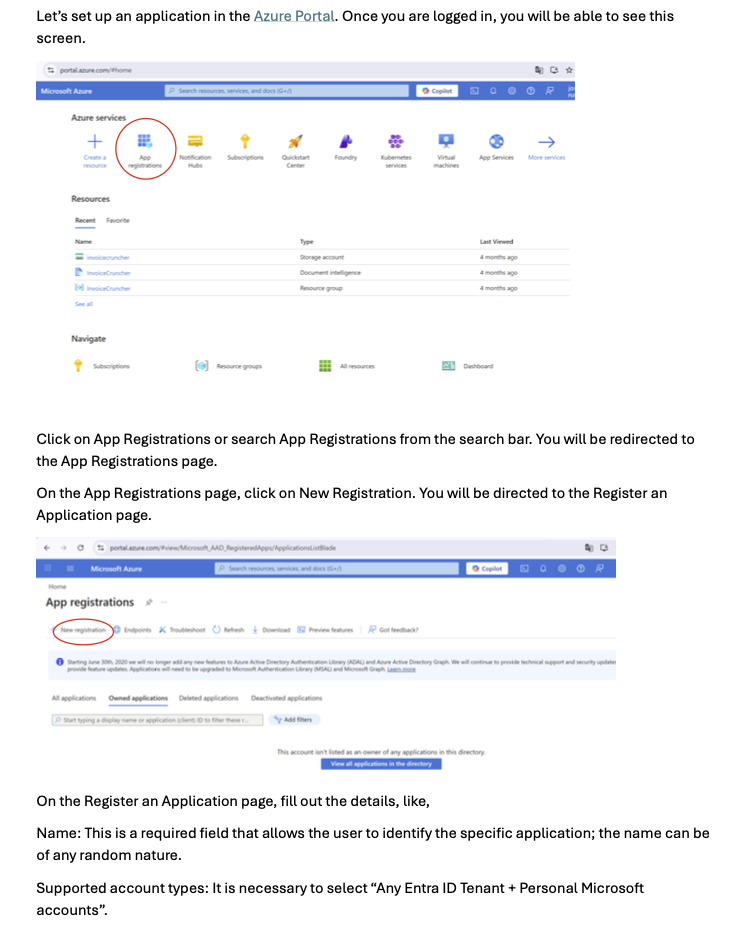
1. Open Azure Portal and create the App Registration
Go to portal.azure.com, search for App registrations and click New registration.
Define a name for the application and, in the supported account types field, choose Any Entra ID Tenant + Personal Microsoft accounts, exactly as shown in the setup document.
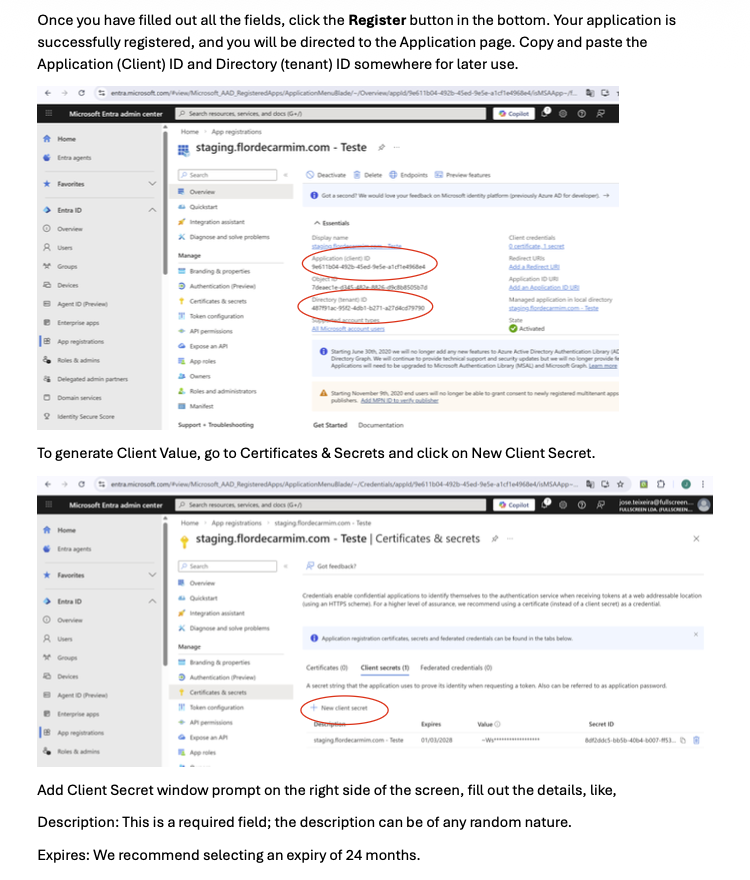
2. Register the application and save Tenant ID + Client ID
After clicking Register, the application is created. On that page, copy the Application (Client) ID and the Directory (tenant) ID.
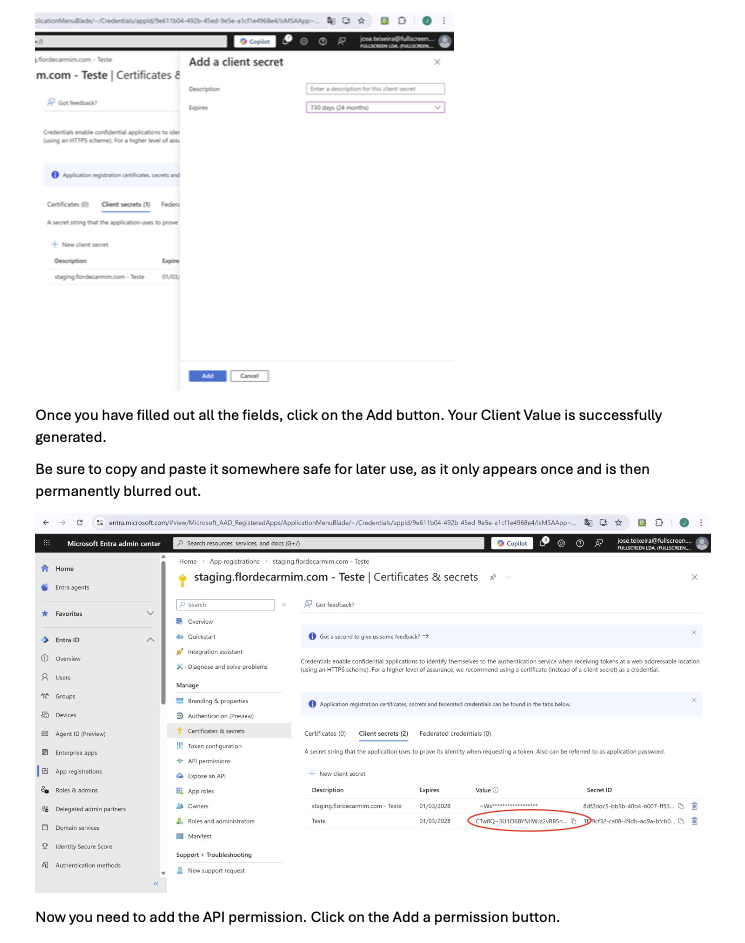
Then open Certificates & secrets, click New client secret, add a description and, following the document reference, choose an expiry of 24 months.
3. Generate the Client Secret and save the value immediately
When you click Add, the Client Secret Value becomes visible only once. Copy it immediately and keep it in a safe place for Studio.
Without that value you will not be able to complete authentication, and once you leave the page the field becomes hidden.
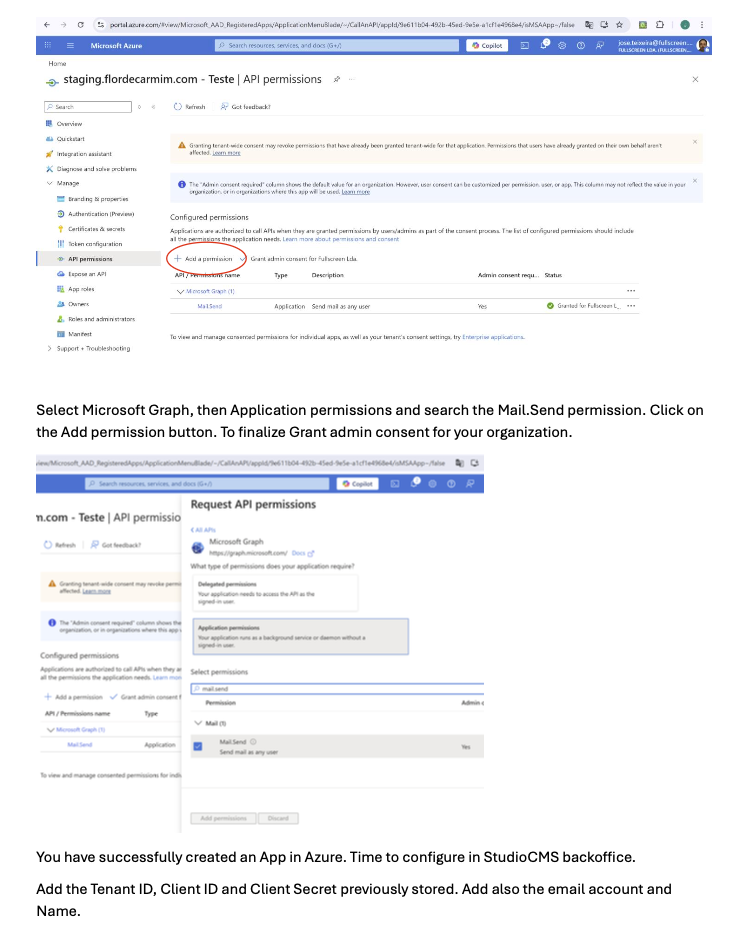
4. Add the Microsoft Graph Mail.Send permission
Open API permissions, click Add a permission, choose Microsoft Graph, then Application permissions, and search for Mail.Send.
Add the permission and complete the flow with Grant admin consent for your organization, so the app is allowed to send emails on behalf of the organization.
5. Return to Studio, fill in the fields and test
In Studio CMS, choose Microsoft 365, paste Tenant ID, Client ID and Client Secret, define Mail From and Mail From Name, and use Refresh Token if needed.
Finish with Save and Test to validate the configuration directly in the backoffice.
Final checklist and troubleshooting
What to validate before closing
Before testing
Confirm that Mail From is consistent with the account being used, that the configuration was saved, and that the provider allows outgoing delivery from the website.
If the test fails
Review port and encryption in SMTP, or in Microsoft 365 confirm that the Client Secret is still valid, that the Mail.Send permission was added, and that admin consent has been completed.
- Form submissions and notification flows depend on this configuration, so do not close the task without a real test.
- If the project changes provider, update the active protocol instead of trying to mix SMTP and Microsoft 365 in the same setup.
- In Microsoft 365, always save the Tenant ID, Client ID and Client Secret Value before leaving Azure.
Explore also
Related pages